Overview
When you try to filter using the Project and a custom Priority field in FogBugz, and you have an On-Premises installation with multiple FogBugz sites set up on the same server (using the same ElasticSearch), you might notice that the search on one of the FogBugz sites is not working correctly.
Solution
Before applying this solution, check the following:
- your custom fields are not having the same names as any default FogBugz fields (ex. Priority, Area, Milestone)
- if you updated your Java version lately, verify that the JVM path of your ElasticSearch points to the correct JDK version
- if you have updated the website certificate lately, verify that the latest certificate is imported into the Java Trust Store used by ElasticSearch
- you tried resetting the ElasticSearch Indexer Backfill
If none of these solutions helped, what you can do is to manually delete the ElasticSearch index of the FogBugz site showing search errors and re-run the installer for that site to have the index re-created with the default settings.
How to Identify that Multiple FogBugz sites use the same ElasticSearch
By design FogBugz instances installed on the same IIS server use the same ElasticSearch instance.
To verify that your ElasticSearch contains data from several FogBugz instances follow these steps:
-
View the ElasticSearch indexes, by opening the default URL of your ElasticSearch (usually
http://localhost:9200), and adding the suffix of the ElasticSearch-head plugin/_plugin/head.
On most instances this would result in:http://localhost:9200/_plugin/head/- If this plugin is not available on your FogBugz site, install it as a Chrome extension and access the default URL (
http://localhost:9200) of your ElasticSearch instance from the extension.
- If this plugin is not available on your FogBugz site, install it as a Chrome extension and access the default URL (
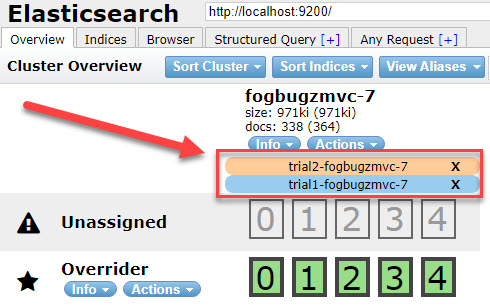
- If multiple instances are hosted on the same server you should see multiple aliases
trial1-fogbugzmvc-7,trial2-fogbugzmvc-7, and so ontrialN-fogbugzmvc-7where N is the number of instances on that server. Something like in the screenshot below:
Manually Delete the ElasticSearch Index
- Identify your site's unique internal ID ixFogBugzTrial, by running the following SQL query:
USE fbhosted SELECT ixFogBugzTrial, sUniqueSiteName FROM tblFogBugzTrial - Using this unique site ID, identify the ElasticSearch index name used by the site by running the following SQL query (replace
<unique-site-ID>with the ID identified at the previous step):USE fbhosted SELECT DISTINCT sIndexName FROM tblESIndex WHERE ixFogBugzTrial = <unique-site-ID> -
View the ElasticSearch indexes, as described in the previous chapter.
-
Delete the index (identified at step 2 under
sIndexName) by clicking on the index and selecting Actions -> Delete. - Refresh (or reconnect to) the page listing the indexes and you should see the index removed. If you see a name like "Deadpool", or "Scarlet Spiders", those are default node names generated randomly by ElasticSearch engine, and it might be a different word for your installation.
Run the Installer to Re-Create the Index
- Get the original FogBugz installation media used for installing your FogBugz site. If you don't have it, you can request it from our Support Team. Make sure you are requesting the same version that you currently have installed.
- Run the installer in an Administrator PowerShell prompt by running the
SetupWizard.ps1and select Option 2 (Upgrade an Existing Installation). - Follow the prompts. You will need to enter the password for the user that FogBugz On-Premises is running under.
- After the installer is done upgrading, verify that the index has been created by opening
http://localhost:9200/_plugin/head/(or using the elasticsearch-head Chrome plugin). - Go to
http://yourfogbugzsite/f/debug/esand verify that your ElasticSearch index has been recently backfilled.
Testing
After the installer re-created and backfilled your ElasticSearch index, your search should be working correctly.
Priyanka Bhotika
Comments