Overview
After migrating to FogBugz On-Premise, search results using filters on custom fields are incorrect.
Solution
Before applying this solution, check the following:
- confirm that your custom fields do not have the same names as any default FogBugz fields (ex. Priority, Area, Milestone)
- if you updated your Java version lately, verify that the JVM path of your ElasticSearch points to the correct JDK version
- if you have updated the website certificate lately, verify that the latest certificate is imported into the Java Trust Store used by ElasticSearch
- try resetting the ElasticSearch Indexer Backfill
- confirm whether multiple FogBugz sites are using the same ElasticSearch
If none of the above solutions resolved the problem, it may be due to legacy versions of FogBugz renaming the fields sComputer and sVersion and using them as custom fields. Filters using these fields in versions including ElasticSearch can return incorrect results.
This issue can be resolved by creating a new custom field, migrating all data from the existing field to the new custom field, and then dropping the old field.
- Create an API Token.
- Create a new custom field through the UI.
- Look for the name of the custom field in the database.
- It should be in Plugin_8_CustomField table, under sColumnName.
- It should look something like yourxfieldb11.
- Append it to plugin_customfields_at_fogcreek_com_.
- This will be the name of the field when referencing it through the API:
plugin_customfields_at_fogcreek_com_yourxfieldb11
- Test the API by Editing the Custom Field Value of a single case.
- The URL should look something like this (Replace the [ ]'s):
https://[FOGBUGZ URL]/api.asp?token=[API TOKEN]&cmd=edit&ixBug=[ANY BUG ID]&plugin_customfields_at_fogcreek_com_yourxfieldb11=TEST
-
Notice how each argument is separated with an &.
-
Enter the URL in a browser.
-
You should get something like this:
-
Search for the specific ixBug number you inserted into [ANY BUG ID], to verify that changes were made to the newly created custom field
- The URL should look something like this (Replace the [ ]'s):
- Extract the data from Microsoft Excel.
- In a blank workbook, navigate to the Data tab.
- On the top left corner, click on Get Data > From Database > From SQL Server Database.
- Enter the database information.
- Find the Bug table and click on it to preview it.
- On the bottom, click on Transform Data.
- On the top, click on Manage Columns > Choose Columns.
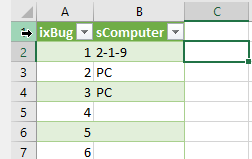
- Deselect every column except for ixBug and sComputer.
- On the top-left, click Close and Load Data.
- Create API requests.
- Click on the 2nd box in the next column over.
- In the function box, type in something like this:
="https://[URL]/api.asp?cmd=edit&token=[TOKEN]&ixBug=" & A2 & "plugin_customfields_at_fogcreek_com_yourxfieldb11=" & ENCODEURL(B2)
-
To break it down:
- Start with an = sign.
- Encapsulate every literal string within quotation marks.
- Append an & before and after each variable.
- The variables are A2 and B2.
- B2 should be URLENCODED, to avoid complications.
- Click on the 2nd box in the next column over.
-
Export the file into a .csv
-
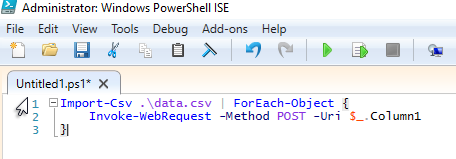
Run a PowerShell script to make each request:
-
Disable the sComputer field.
-
You can actually disable the sComputer field, so that it won't appear in your UI.
-
In the dbo.Settings table, find fCustomVisible1 and fCustomVisible2 and set those to 0.
-
Note: Running the script in step 8 will individually update each case, which will send email notifications for every updated case if notifications are set to Instantly (individual). To avoid unwanted emails, temporarily set Email Notifications to Never until the script is complete.
Testing
To test that the solution worked, create a new filter using the new custom field and confirm that it is returning expected results.
Priyanka Bhotika
Comments